main controls
documentation of the main controls panel of ALS
In this chapter you will get deeper knowledge about ALS use through its interface.
The ALS User Interface is designed to be intuitive and user-friendly, allowing you to focus on your work without unnecessary distractions.
ALS interface is composed of six major elements, each playing a key role in the software’s usability.
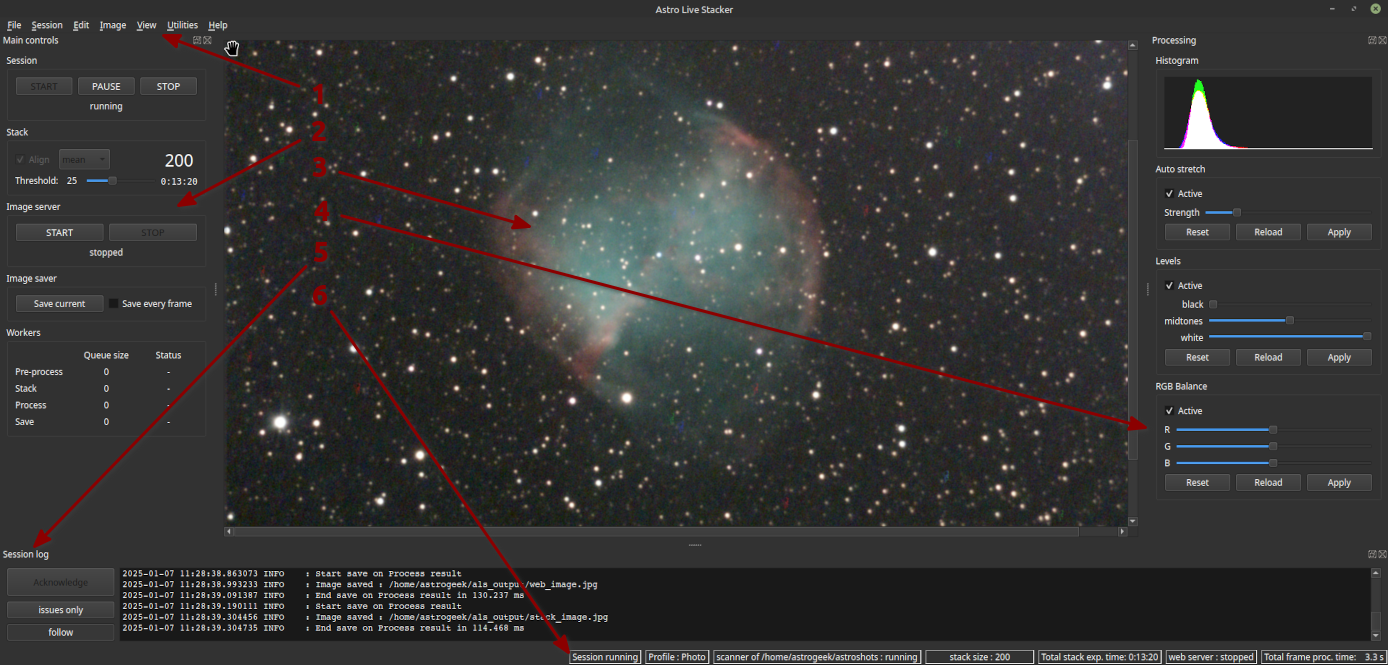
ALS Interface Layout
Below is an overview of these components:
1: Main Menu
Provides access to every ALS feature and setting.
Learn more in the Menu Documentation.
2: Main Controls Panel
Located on the left by default, it’s your daily control panel.
Dive deeper in the Main Controls Panel Documentation.
3: Central Area
Displays the image resulting from stacking and processing.
Image navigation is covered in the Quickstart page.
4: Processing Panel
Found on the right side, this panel allows you to fine-tune your images using various processing tools.
Explore details in the Processing Panel Documentation.
5: Session Log Panel
Positioned at the bottom, this panel helps you monitor progress and track events or issues during the session.
Find out more in the Session Log Documentation.
6: Status Bar
Located at the bottom of the interface, the status bar provides real-time updates on system status
It is divided into several labels:
Some interface elements have specific behaviors that can be useful in your daily work.
Panels in ALS allow for a flexible interface that can adapt to different workflows.
By default:
Main Controls panel is docked on the left side of the main window.Processing panel is docked on the right side.Session Log panel is docked at the bottom.Panels can be docked to specific zones in the main window or detached to become independent floating elements.
These floating panels can be freely positioned anywhere in the display area, even across multiple screens.
Main Controls and Processing panels can be docked to the left or right sides.Session Log panel can be docked to the top or bottom.A floating panel can be re-docked to its default position by double-clicking on its title bar.
The sliders in ALS allow users to adjust various parameters in an intuitive way.
Here are the different methods of interacting with them:
The most straightforward way to change a value:
If you’re using a mouse with a scroll wheel, this can provide fine-tuned adjustments:
Clicking directly on the slider bar adjusts the associated value in larger increments compared to using the mouse wheel:
documentation of the main controls panel of ALS
Documentation for the ALS Processing Panel
Documentation for the ALS Session Log Panel
ALS Keyboard Shortcuts
The main menu